For the previous years at my school, I have taken part in the electric car team. The purpose of the team is to design and build efficient electrical race cars. Generally, each year we revamp or scrap one of the older cars we have, and build a new car, with improved and refined technology.
Near the end of the school year, there are several competitions that allow us to compete with other high schools. There are 2 events that take place: the 12 volt race, and the 24 volt race. In the 12 volt, each car must draw power from a single 12 volt car battery, and complete as many laps as possible within one hour. The car that completes the most laps wins. In the 24 volt, each car is powered by 2 car batteries, and as such, the cars have plenty more power and lifetime, making a skilled driver much more important. Speeds in the 24 volt can reach up to 70km/h. In 2010, 11 schools from eight different school boards visited ODSS for this year’s annual electric car competition, which will test the distance traveled by each vehicle in 12-volt and 24-volt competitions. In 2009, Mr.Weishar, our teacher and team leader said the 24-volt winning car covered 38 kilometers in an hour while the 12-volt winning car traveled about 31 clicks.
 |
|
In this picture here, from 2010, you can see 3 of the cars built by our team. In the front, number 64, is one of the older models we have. It has a Styrofoam and fiberglass body and focused on maximum aerodynamics. That car is currently being revamped to more advanced standards this year. The next car, in the middle of the shot, number 21, was a successful experiment, in that we made the car as small and as agile as possible. The steering control was the same as an ATV, as in a handlebar that gave the driver more leverage than a steering wheel. That car has done quite well in competitions, all though it has the tendency to roll over at high speeds. Finally(and in the picture below), in the very back is the car we affectionately named 'The Tank'. The idea behind it was to have a heavier body, with a much stronger motor. We found it to be quite troublesome to build, quite hard to control, and overall severely sluggish. as such, it was scrapped for parts at the end of that year. The car that was built in 2011 is of course not shown here, but I'll mention it anyways. It uses a very smart boost power system, where a smaller motor powers the car around turns and other situations that call for agility, but on straightaways, the driver activates a much larger motor for a very powerful speed boost. So far, it has placed fairly high in the competitions it raced in.
 |
The Team was featured in the local paper during
the 2010 competition that took place in Orangeville
|
Overall, I have highly enjoyed being part of the team, and have learned quite a lot about design and innovation from it. It has given me a large understanding about the design process, and taught me skills that I will be able to carry with me throughout my life.


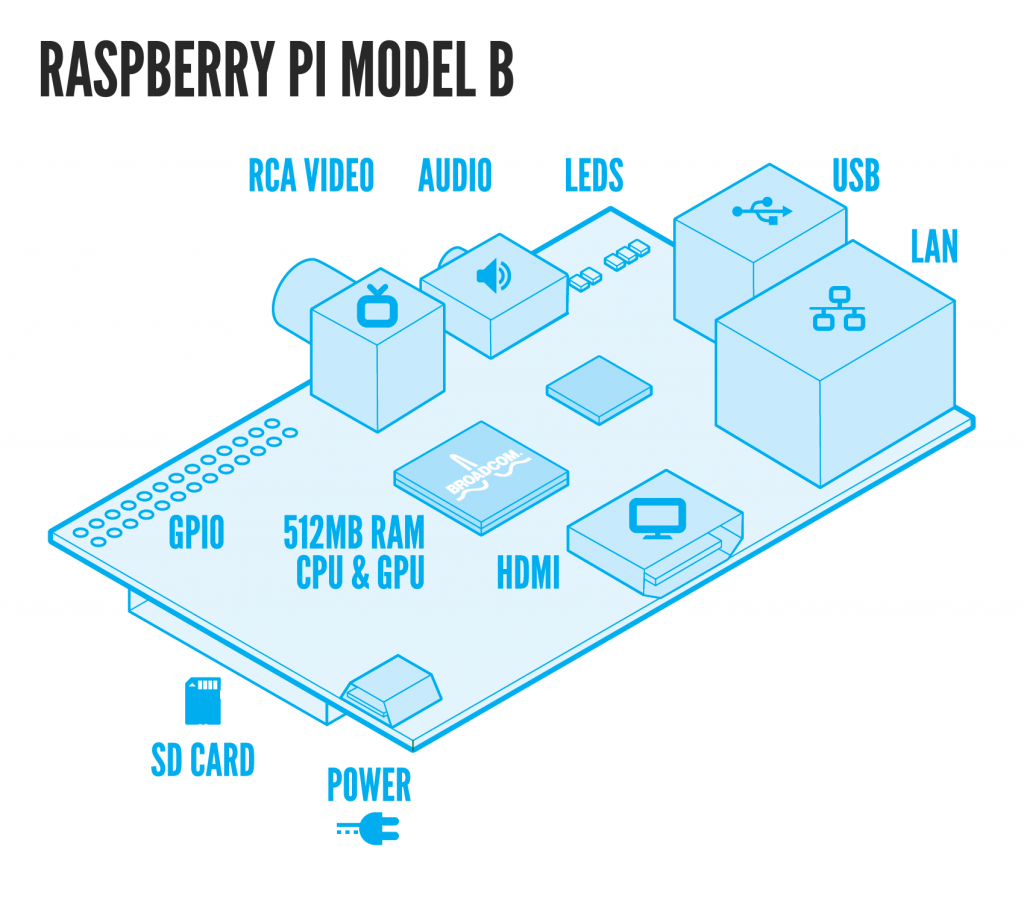
 Allow me to show you the Raspberry Pi. It's a very capable computer for its size, just a bit larger than a credit card. The point of it is to introduce programming to kids, to help them build fundamental skills for a career in software engineering. The problem that the makers of this found was that kids were entering post-secondary education with less and less understanding of computers and software. Previously, kids would learn about computers by playing around with simple platforms like the Commodore 64. So the Raspberry Pi was created, a small computer built specifically for hobbyist programming. At its heart is a ARM11 chip, which gives it roughly the same computing power as a first generation Xbox or Playstation. It has 2 usb ports, one for a keyboard and one for a mouse, a lan socket, a mini usb plug to power it with a 5V power source, an RCA and HDMI port for video, and a SD-card slot that it uses for memory.